Description:
About this item:
Review:
5.0 out of 5
100.00% of customers are satisfied
5.0 out of 5 stars Great 3D printer.
(function() { P.when('cr-A', 'ready').execute(function(A) { if(typeof A.toggleExpanderAriaLabel === 'function') { A.toggleExpanderAriaLabel('review_text_read_more', 'Read more of this review', 'Read less of this review'); } }); })(); .review-text-read-more-expander:focus-visible { outline: 2px solid #2162a1; outline-offset: 2px; border-radius: 5px; } For being a novice 3D printer person, this device can do a lot of things. A friend of mine has this same printer and with his help and previous knowledge from using the same printer, I have really learned a lot and his expertise has helped me with a lot of questions that I would have had to ask others about. I ordered this 3D printer on 28 Jan 2021 and it was delivered on 04 Feb 2021. Creality really does a great job packing all of the parts and pieces. It took a little bit of setting up, but watching several YouTube videoes on how to unbox and setup this printer really was a big help. The most critical thing with this printer, is making sure that the bed is level. If your bed is not level, then the filament will not stick to the surface of the bed. It will take 30-45 minutes to level your bed. There are several videos on YouTube on "How to level your Ender 3 v2 printer". Also, depending on what type of filament you are going to use, you need to know what is the best nozzle temperature to set. I found that the GEEETECH, MILKA and HATCHBOX PLA filaments are the best, but that is my own opinion. I found that 185 Celsius for the nozzle temp and the bed temp of 50 degree Celsius was the best settings. But, most manufacturers will have printed on the side of the spool what temps to use and also when you use the "slicer program" for the things you want to print it will already be programmed into the "gcode". But, still set the temps to 185C and 50C for the PLA filaments and see how that works.I also ordered the "Ender 3 Springs, Creality Upgraded 4PCS Hot Bed Die Springs with 4PCS Aluminium Hand Twist Leveling Nut for Ender 3/3 Pro/3 V2, Ender 5/5 Pro/5 Plus, CR-10, CR10S/10S Pro, CR 20 3D Printer" kit. This replaces the springs that come with the Ender 3 printer and is a more sturdier spring (hot die spring) instead of the less sturdier spring that comes standard on this printer. It will keep your bed level after several prints.Also, make sure that you check the belts for the X and Y axis after several prints. All you have to do is to tighten the knobs just a fraction of a turn, but make sure not to overtighten.My friend printed me some additions, which we found on "Thingiverse.com", to add onto my printer which really helps, one is a pulley wheel that attaches to the side of the printer to help streamline the filament from the spooler to the extrueder so that it doesn't crimp when printing. Also, I have printed several items that I downloaded from THINGIVERSE.COM and all of them turned out great. I found out from my friend that using blue painters tape and the Elmer's Purple glue stick really helps the different filaments to stick to the surface. Put the blue painters tape down and then level your bed and once leveled, then use the purple glue stick on the painters tape and smooth with your finger. I also downloaded the slicer software "CURA" (the "slicer software") to create the "gcode" that this 3D printer uses to print your items that you download from "THINGIVERSE.com". There is a "slicer" program that comes with the printer on the SD Card and it looks just like "CURA" but Creality just added a few other things to make it look a little different. Either "slicer program" will work. I have also purchased about $200 worth of PLA (harder) and PETG (softer) filaments. Should not be running out of that anytime soon. Overall, Creality does make a great printer and so far, I have not had any issues to be really concerned about. Overall, I give this printer a 5 out of 5 stars. Just do your research on what you and your friends are likely to use. I am very pleased and recommend this printer to everyone. Those people that are giving this device bad reviews are ones that have no idea on what they are doing and have not done the reasearch in order to make this thing enjoyable. You just can not setup this printer and expect it to automatically print. There is some work involved and once you do the research and learn from those that have gone thru these situations, i guarantee that this device will be the next fun thing that you will ever own and have fun using day-in and day-out. I am glad i had the expertise from my friend or I might be giving some critical reviews also. Do your homework. I think this is the future toy that everyone will have in their household. Happy 3D printing!19 April 2021I have had this printer for almost 3 months now, and i can say that I have had no really big problems with this 3D printer from Ender. Yes, there is a few twikking that needs to be done from time-to-time, but if you have the patience, this thing can really be fun for you and the family. Once again, the biggest thing is getting the bed level but usually you don't have to worry with that until after 8-10 prints. Again, i use the Blue Painter's tape for the filament to adhere to and i also used the Purple Glue Sticker. For smaller and more detailed prints, using these 2 things can make for removing your print a little difficult. I use a little rubbing alcohol and it will come loose. For finer prints where things are more detailed, you might also want to slow the speed of the print from 100% to about 50-70%. I have printed some pedals or flowers for the hummingbird feeder that i made and the print speed needed to be adjusted and really did a fine job. Using the faster speed (100%), the detailed flowers were messed up. I would still recommend this to everyone. I enjoy my Ender 3D printer everytime i print something. Good luck.
5.0 out of 5 stars Amazing printer!
The Ender 3 marked my entry into the 3D-printing world, and I love it! The 3D printer has been a godsend! If you're also newbie and searching for advice, here's my brief take on the Ender 3. It's awesome!The Ender 3 arrives in pieces that you must assemble. Since it is essentially a robot, assembly can seem overwhelming at first, but if you take it one step at a time, you'll be printing in no time. I found the printed instructions accompanying the unit to be more sizzle than steak, but, fortunately there are several videos on YouTube that make assembly a breeze. Believe it or not, assembling the unit yourself is beneficial because it familiarizes you with the device. It will allow you to easily make the minor adjustments that 3D printers often require.My wife and I have found that 3D printing comes with somewhat of a steep learning curve, but it's fun. YouTube and websites such as "all3DP dot com" have proven themselves to be life savers.The most common adjustments you'll make while 3D printing is "bed leveling." In truth, though, you're not actually "leveling" the print bed, but rather you're ensuring that the print nozzle is uniformly distanced from the bed (the print surface) on all its 4 corners. The nozzle needs to be super close, too. ...not about an inch or two away from the print bed, but rather it needs to be no further than the thickness of a piece of paper. Crazy, huh?When my wife and I printed a test file provided by Creality (the manufacturer), we frankly sat mesmerized at the unit's precision. It was like staring into a campfire and getting lost in the flames. The nozzle just zipped back and forth across the print bed leaving tiny bits of corn-based "plastic" one layer at a time, and eventually (over time) created a cat/dog thingy.In search of more things to print, we settled on two websites with tons of 3D-printable files that are very often free to download. The websites are "thingiverse dot com" and "cults3d dot com". The latter site takes longer to load, but seems to have more options. Creality has one too, but I haven't really checked it out yet. It's important to note that the files you download from such websites are *.stl files, whereas the Ender 3 needs *.gcode files. To make the file conversion, we downloaded a piece of software called Cura. It appears to be the best (free) software on the market for "slicing" 3D files into *.gcode files. That too has a steep learning curve, complete with complicated settings. But fortunately there are lots of tutorials online along with settings you can copy from experts. I mostly rely on "all3DP dot com" for that.After a while, we decided to invent our own designs and then print them into existence. In my opinion, the cat's meow -- the best and easiest 3D design application -- is Fusion360. It has a limited free version for students and schools, but otherwise it's quite pricey. My wife then found free, open-sourced design software called FreeCAD. We love it, and haven't turned back since.The filament we prefer is PLA. In our experience, PLA produces little to no fumes and it's guilt-free because it's corn-based and biodegradable. It should be noted, though, that not all PLA is created equally. This is primarily because (according to what I've read) pigments affect the PLA in different ways. So, when I order PLA from Bolo, I always look for the PLA with the most and highest reviews. Then, I refer upon their temperature recommendations.Overall, we absolutely love the Ender 3. At under $200, it's extremely affordable, and the process of printing things into existence can be (in my experience) somehow transformative. And if you find yourself confused about something, take my advice by not wasting time by trying to figure it out for yourself. Just refer to the experts on any of the websites I mentioned so, later on, you can focus on things that really matter...like design.Note: the bearing on a little fan went out. So, I reached out to Comgrow, they got back to me immediately, and now a new fan is on the way. No fuss no muss.Finally, at the risk of getting to personal, I'm a disabled veteran who benefits from focusing on tangible things. The process of 3D printing has proven itself to be such a godsend in that regard, that I think the VA should seriously explore ways of getting more vets 3D printing.I hope this helped newbies like me. Happy printing!
It's a fantastic, very adequately-priced 3D printer for beginners
(function() { P.when('cr-A', 'ready').execute(function(A) { if(typeof A.toggleExpanderAriaLabel === 'function') { A.toggleExpanderAriaLabel('review_text_read_more', 'Read more of this review', 'Read less of this review'); } }); })(); .review-text-read-more-expander:focus-visible { outline: 2px solid #2162a1; outline-offset: 2px; border-radius: 5px; } I really gotta give props to Creality for making this printer so affordable and (relatively) easy to set up and use. Since getting it I learned a <ton> of stuff about 3D printing (both by being forced to do it and trying to troubleshoot all the different issues :P)It's a great printer for the price, not sure what else I can say. Initial assembly was relatively easy and took around an hour. Then I realised I haven't done it properly so I had to re-assemble parts I assembled before (another 1h). Then a couple of days later I realised the frame is not straight... So I disassembled and re-levelled the whole thing from scratch (another 2h or so) Then i've done it yet again a couple of days later to straighten the gantry :P Unfortunately factory pre-assembled parts were not perfectly assembled. The bed is not perfectly even either, seems a bit warped but oh well the glass bed upgrade is too expensive.Usage is straightforward after assembly, there's an amazing amount of 3D-printable improvements to the Ender 3, tons of guides and information readily available. SD card slot is a great addition but you'll probably want to move to an Octoprint setup for ease of use and to flash a more recent Marlin firmware.Unfortunately the Pause feature has bugged out multiple times on me on the original firmware (just freezes printer in place, ruining prints) but at least the power-loss recovery works fine (once it freezes just shut it off and back on and it will give you an option to resume). No such issues with the custom-built Marlin fw.Worth noting is that my unit came with a 4.2.2 32-bit motherboard, an extruder guide enforced with metal and adjustable tension. Attached amount of filament was almost enough to print the sample doggy figure - you can clearly see where the filament ran out ;(Overall it's a fun learning experience but if you're expecting to just "buy, print and forget" - this might be the best choice for you as it has no auto bed levelling and other features present in more expensive printers (unless you upgrade it yourself)Definitely watch one or two assembly videos to get an idea of what to look out for during assembly, it will save you time in the longer run
This is probably one of the best FFF 3d printers there is at this price bracket.
The device is simple yet works like a charm. The price point at which this is available makes the overall package extremely good. I have a dislike though, mine had a faulty power supply unit right out of the box ( which i got replaced by WOL the very next day!). The QC seems to be have taken a back seat (only in my case or probably with every box that that they ship) either with WOL or Creality, and that i woulnt know. The power supply unit was having scratch marks and sorts. After the power unit swap, the printer works like a charm. I tried PLA and PETG, they both work well. A word of advice though, the device comes with short length sample PLA test print filament and that is absolute garbage. So, if you want see what this printer is capable of buy some good quality PLA filament along with the printer itself.
Toller Einsteiger 3D Drucker
Ich bin ein 3D Druck Neuling. Daher war der Ender 3 pro auch mein erster 3D Drucker.Vorerst war ich etwas geschockt über einige schlechte Bewertungen (sowohl auf Bolo, als auch auf YouTube), die über verzerrte Drucker und durchhängende Druckbetten berichten.Jedoch habe ich mich wegen des guten Preises für den Ender 3 pro entscheiden und wurde nicht enttäuscht.Der Aufbau des 3D Druckers war sehr einfach und toll in der Anleitung beschrieben.Auch die Verkabelung war sehr eindeutig in der Anleitung beschrieben.Im Vorfeld habe ich mir schon eine 3D Datei vorbereitet und diese im Prusa Slicer gesliced.Nach dem Zusammenbau habe ich den Drucker an den Strom angeschlossen und die SD Karte mit der G Code Datei eingesteckt.Nun habe ich die Nozzle vorgeheizt um das Filament einzufädeln. Das ging nicht so leicht wie erwartet, ist aber mit ein bisschen Fummelei schnell zu machen.Anschließend habe ich den Druckvorgang gestartet und der Drucker fing mit dem automatischen Nullen der Achsen an und heizte danach das Bett und die Nozzle.WÄHREND DES GESAMTEN DRUCKVORGANG STAND ICH IMMER MIT EINER HAND AM STECKER DES DRUCKERS, UM IHN ZU STOPPEN, WENN ETWAS PASSIERT, DAS SICH NICHT RICHTIG ANHÖRT ODER NICHT RICHTIG AUSSIEHT.Fazit: Ich bin sehr alles in allem sehr zufrieden und habe einen guten Start in den 3D Druck bekommen. Die Druckqualität reicht mir, ist aber wenn es um Feinheiten geht manchmal nicht ausreichend. Für große Drucke reicht es aber alle Mal!Er bekommt von mir klare 5 Sterne, weil er ein super Einsteiger Drucker ist, der mir einen tollen Start in den 3D Druck gewährt hat. Große Empfehlung!
Bin sehr zufrieden
Die Rezension bezieht sich auf die Version Ender 3 Pro V1. Inzwischen gibt es die V2 die klar bevorzugt werden sollte da diese das Silent Mainboard vorinstalliert hat.Als Einsteiger in die 3D Druckwelt habe ich mir dieses Modell gekauft da es recht verbreitet zu sein scheint und dementsprechend einfach Hilfe bei Problemen zu finden sein sollte.Aufgrund diverser Empfehlungen aus dem Netz hab ich den Drucker von Anfang an nicht in der Standardkonfiguration betrieben sondern ein paar Teile ausgetauscht:- Capricorn PTFE Schlauch- Redrex Bowden ExtruderAus dem großen Thingiverse Schatz hab ich mir auch das ein oder andere Upgrade selbst gedruckt. Für die Druckqualität wichtig scheinen so kleine clips zu ssein die ein wackeln des PTFE Schlauchs verhindern.Der Aufbau ist mehr als simpel und sollte niemanden vor eine Herausforderung stellen. Einzige besonderheit die ich auch im Netz nachgoogeln musste: Der Schlitten der x-Achse also wo der Extruder dran ist war nach dem Zusammenbau seeeeeehr wackelig. In der Anleitung nicht erwähnt wird, dass an der unteren Schraube mit der Rolle eine Exzentermutter angebracht ist die gedreht werden kann damit der Schlitten spielfrei läuft.Jetz der wichtigste Punkt überhaupt: Lasst euch zeit beim Einstellen des Bed Levelings. Für einen erfolgreichen druck ist es das A und O. Beim ersten Versuch hab ich nicht richtig aufgepasst und es zu eng eingestellt, sodass die Düse leicht "durch" die Magnetplatte gefahren ist. Zum Glück nur am Rand, aber es wäre ärgerlich es auf die Art kaputt zu machen. Ebenfalls ausdrücklich davon abraten möchte an diese Platte mit dem Spachtel zu gehen, da man jedesmal einen dünnen teil der Oberfläche mit abträgt. Wenn das Bed Leveling stimmt lassen sich Reste oder ähnliches leicht mit dem Fingernagel entfernen.Auf der beiliegenden SD Karte sind 2 oder 3 Beispiele drauf. Es ist Zeitverschwendung diese zu Drucken. Ich habe in meiner Unkenntnis das Sparschweinchen gedruckt. Es dauert nicht nur ewig, die Qualität ist auch absolut mies. Daher lieber etwas schönes aus dem Netz suchen und durch den Cura Slicer schicken, die Qualität dieser Drucker ist einfach nur unfassbar besser. Keine Ahnung warum der Hersteller hier sein Produkt unnötig schlecht macht.Die Lautstärke in der Roh-Version (die es inzwischen wahrscheinlich nicht mehr gibt da durch die V2 abgelöst) ist... nicht Wohnzimmer geeignet. Definitiv nicht! Durch Austausch des Mainboard und diverser Lüfter lässt sich durchaus was rausholen.Da es mein einziger Drucker ist konnte ich die Qualität nur anhand einiger Youtube Videos mit anderen Modellen vergleichen, aber ich selbst bin überaus zufrieden mit dem was der Drucker ausspuckt. Die Bedienung ist sehr leicht und wie erwähnt empfehle ich den Cura Slicer dessen Ender 3 Profil "perfekt" ist. Hatte jedenfalls keinen Aufwand daran herumzufummeln oder Werte anzupassen, das lieferte Out of the Box prima Ergebnisse.Ich habe bislang ausschließlich PLA gedruckt, kann also über andere Materialien nichts sagen.Nachträglich habe ich mir das Creality Board 1.1.5 Silent zugelegt was die Lautstärke der Stepper massiv reduziert.Inzwischen würde ich allerdings zu dem neuen BigTreeTech 2.0 Board raten, da dieses nicht nur Silent Stepper Driver verbaut hat sondern auch einen größeren 32Bit Controller verwendet, der genügend Platz für alle Features der Firmware bietet während die Crealitiy Boards nur die Sanguino atmega1284p verwenden die einfach nicht mehr den benötigten Platz bieten um "alle" Features der Marlin Software unter zu bringen.Ebenfalls habe ich mir Dämpfer für die Motoren gekauft, diese sind aber nur mit SEHR VIEL gebastel am Gerät anzubringen, da die grundlegende Konstruktion nicht für ein vergrößern der Abstände ausgelegt ist. So müssen beispielsweise die aufgepressten Riemenzahnräder weggeflext werden und durch Schraubbare ersetzt werden um Abstände auszugleichen. Diese Modifikation würde ich nicht nochmal machen.Fazit: Würde ich das Gerät wieder kaufen? Ja definitiv. Es sind zwar meiner Meinung nach einige Mods und damit Zusatzkosten nötig, aber da ich gerne Bastel ist das durchaus Willkommen. Die Druckqualität ist meiner Meinung nach hervorragend und die Bedienung kinderleicht, kompliziertester Teil ist das Bed Leveling.
A good printer
****UPDATED FEBRUARY 2021****Most problems have been solved, thanks! They sent me replacement and/or partial refunds for the problematic parts. Thanks a lot!Ender 3 pro is long to build - be sure to watch Youtube Videos as written info isn't enough - but it's fully customizable, affordable and printing quality is amazing. You have to put some efforts into it, beware, but the satisfaction of your 3d printer working perfectly is worth it.
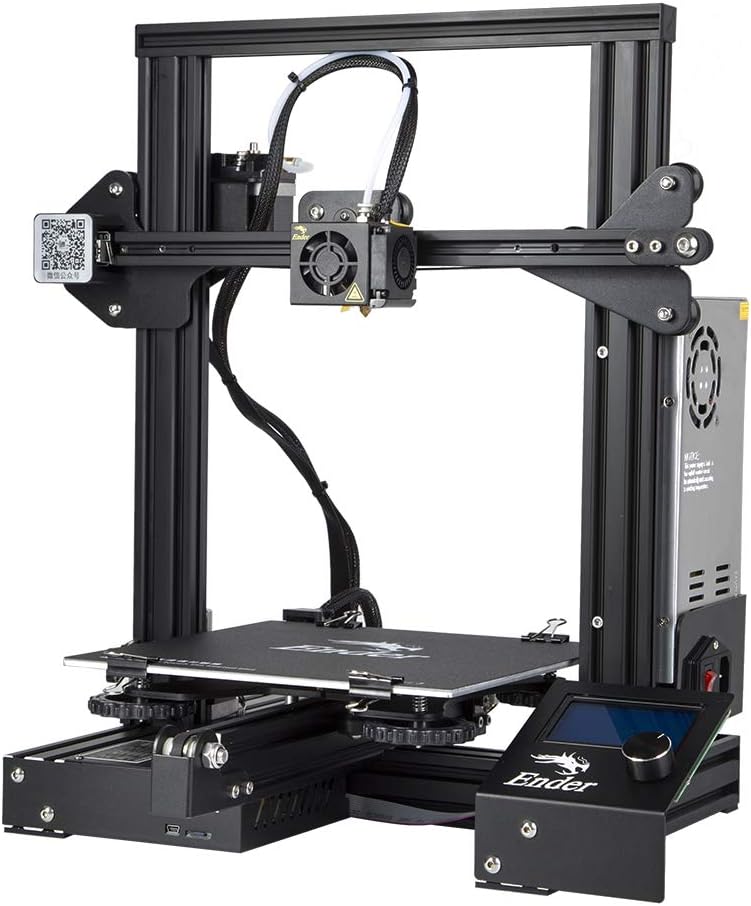
Visit the Comgrow Store
Official Creality Ender 3 3D Printer Fully Open Source with Resume Printing Function DIY Printers Build Volulme 8.66x8.66x9.84 inch
BHD126974
Quantity:
Order today to get by
Free delivery on orders over BHD 20
 Product origin: United States
Electrical items shipped from the US are by default considered to be 120v, unless stated otherwise in the product description. Contact Bolo support for voltage information of specific products. A step-up transformer is required to convert from 120v to 240v. All heating electrical items of 120v will be automatically cancelled.
Similar suggestions by Bolo
More from this brand
Similar items from “3D Printing Filament”
Share with
Or share with link
https://www.bolo.bh/products/UO07OE3S9A6